Introduction
Setting up a new device for a developer usually means installing tools, cloning repositories, and applying configurations, all in a specific order. Microsoft Intune handles app and script deployment well, but it does not guarantee execution order. A Git install that finishes after the script that clones your repos is a problem.
Nerdio Scripted Sequences solve this. Introduced in Nerdio Manager for Enterprise (NME), Scripted Sequences let you define complex, multi-step task workflows with a guaranteed order of operations. They target Intune-managed devices, including Windows 365 Cloud PCs, and execute tasks sequentially through the Nerdio Endpoint Worker.
In this post we will build a real-world developer workstation onboarding sequence that installs Git, Visual Studio Code, clones team repositories, and confirms completion, all in the right order, every time.
Note: Scripted Sequences are in Public Preview. Feature scope and limitations may change in future NME releases.
What Are Scripted Sequences?
Scripted Sequences are an automation feature in NME that lets you create multi-step task workflows deployed to Intune-managed devices. Think of them as a lightweight task sequencer built into the Nerdio console.
Key characteristics:
| Aspect | Detail |
|---|---|
| Supported targets | Intune-managed devices, including Windows 365 Cloud PCs |
| Execution engine | Nerdio Endpoint Worker (deployed via Intune platform script) |
| Concurrency limit | 100 concurrent tasks per sequence |
| Task types | PowerShell scripts, Winget installs, and other Intune-deliverable actions |
Sequences respect the defined order of operations: Task 2 will not start until Task 1 completes successfully. Tasks can be grouped into Task Groups for logical organization. You can clone sequences, groups, and individual tasks for faster iteration.
Prerequisites
Before building your first sequence, make sure you have:
| Requirement | Detail |
|---|---|
| Intune integration | Enabled in NME under Settings > Environment > Integrations > Intune |
| Target device | A Windows 365 Cloud PC or Intune-managed Windows device |
| Nerdio Endpoint Worker | Deployed to the target device (covered in Step 1) |
| Permissions | NME admin role with access to the Automation module |
The Demo Scenario
We will automate day-one setup for a developer joining the team. The sequence installs prerequisites first, then tools, then runs a configuration script, in that exact order.
| Order | Task | Purpose |
|---|---|---|
| 1 | Set PowerShell Execution Policy | Allow scripts to run (RemoteSigned) |
| 2 | Install Git | Version control tooling |
| 3 | Install Visual Studio Code | Code editor |
| 4 | Clone repos and configure VS Code | Pull team repos and install extensions |
| 5a | Add registry key | Create the completion marker key |
| 5b | Set registry value | Confirm the sequence finished |
Let’s build it.
Step 1: Enable the Intune Integration
Before you can use Scripted Sequences, the Intune integration must be enabled. This is where NME connects to your Intune tenant.
- Navigate to NME > Settings > Environment > Integrations > Intune.
- Ensure the Intune integration is enabled.
Note: The initial Endpoint Worker deployment is controlled by Intune platform script delivery and may take some time. Subsequent tasks to the same device execute within a 15 to 30 minute window.

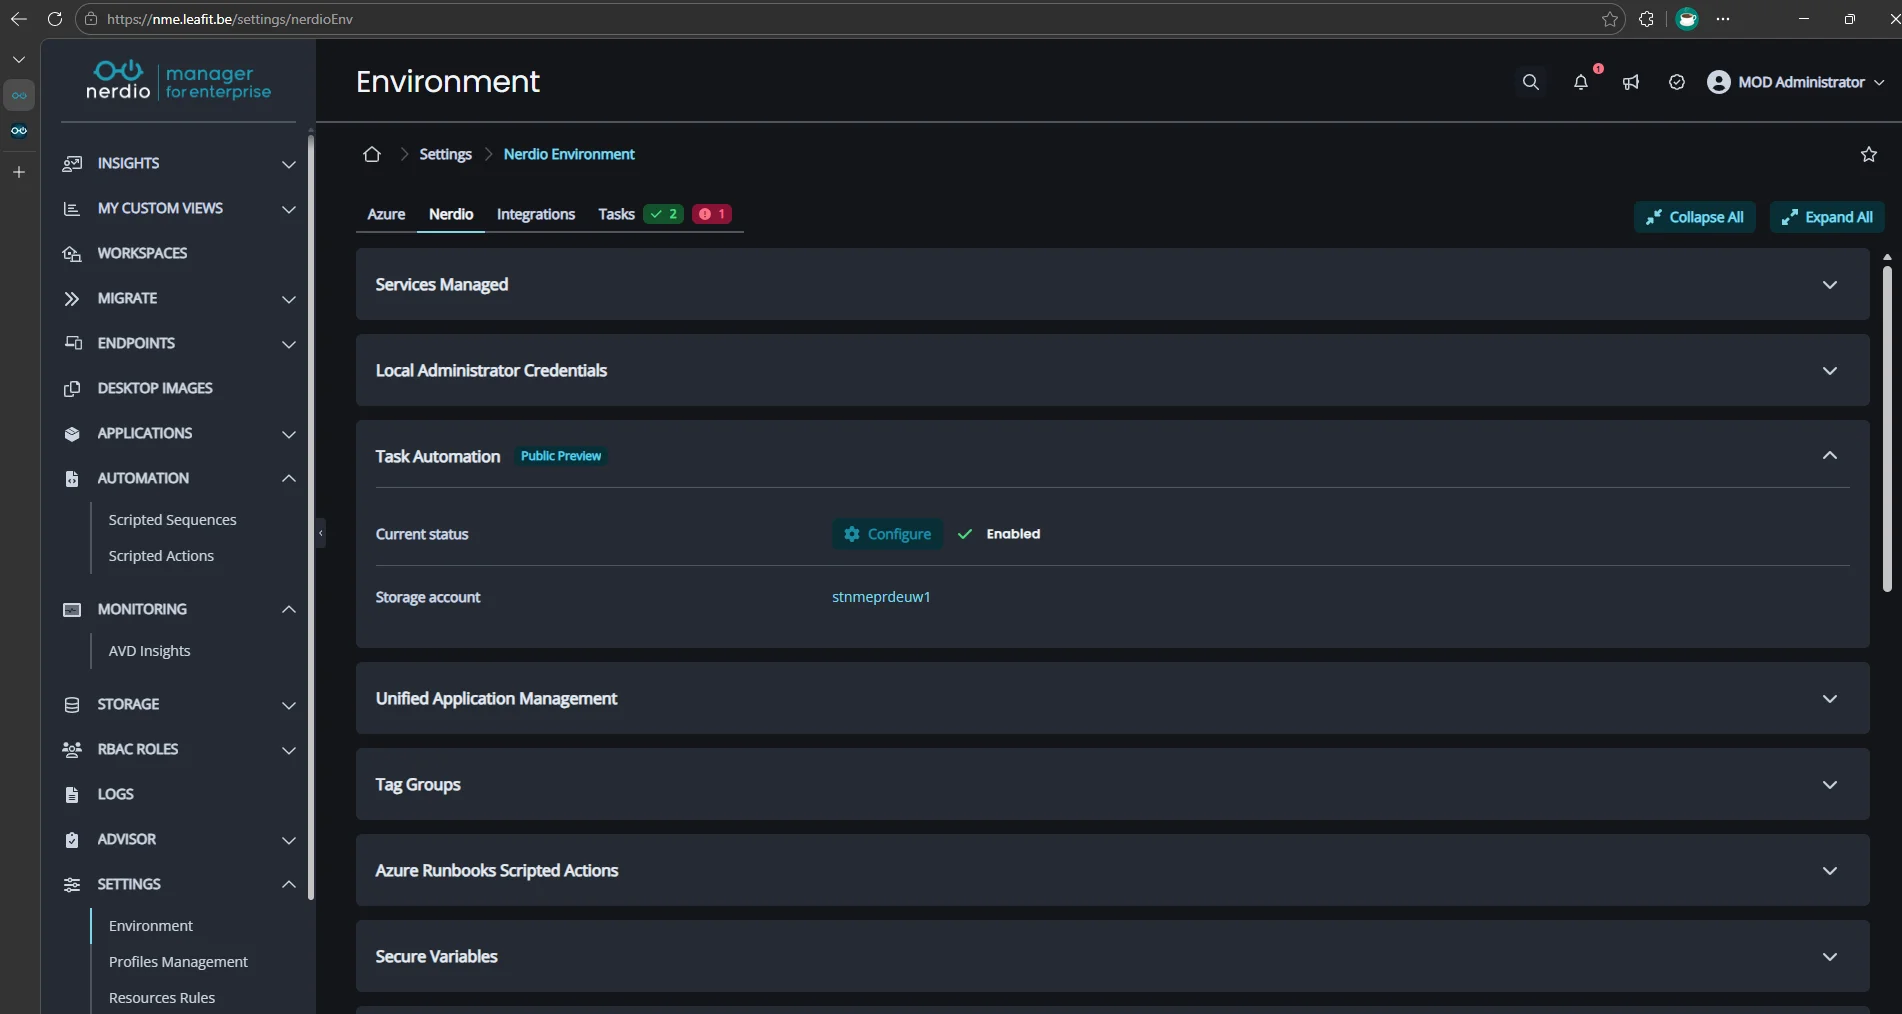
Step 2: Configure Task Automation
Task Automation must be configured before you can create or run Scripted Sequences.
- Navigate to NME > Settings > Nerdio Environment > Task Automation.
- Click Configure.
- Enter a name and select a resource group for the Azure storage account that Nerdio Manager will create.
- Click Save to complete the configuration.
Warning: If your NME deployment uses the Enable Private Endpoints scripted action, the storage account created here may have public network access disabled by default. The Nerdio Endpoint Worker on target devices needs to reach this storage account, so verify that public access is enabled or that a private endpoint is configured for it.
Step 3: Create the Scripted Sequence
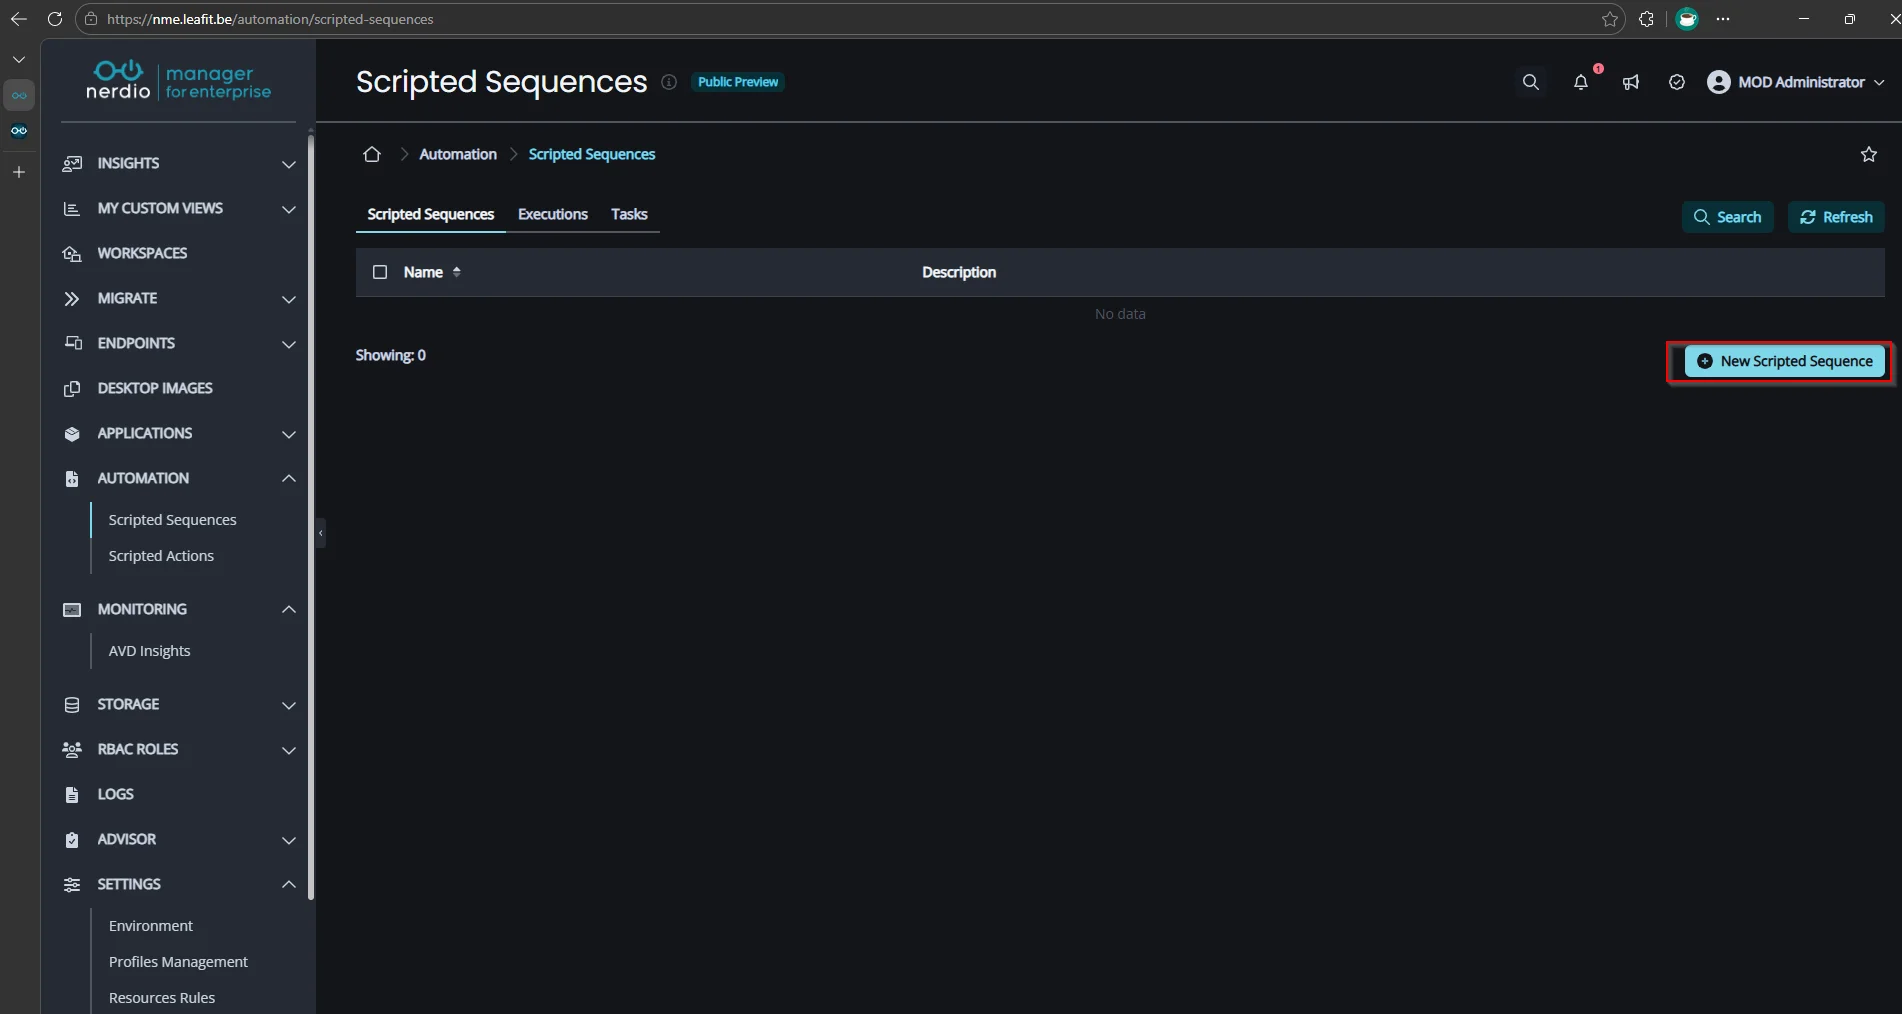
- Navigate to NME > Automation > Scripted Sequences.
- Click New Scripted Sequence.
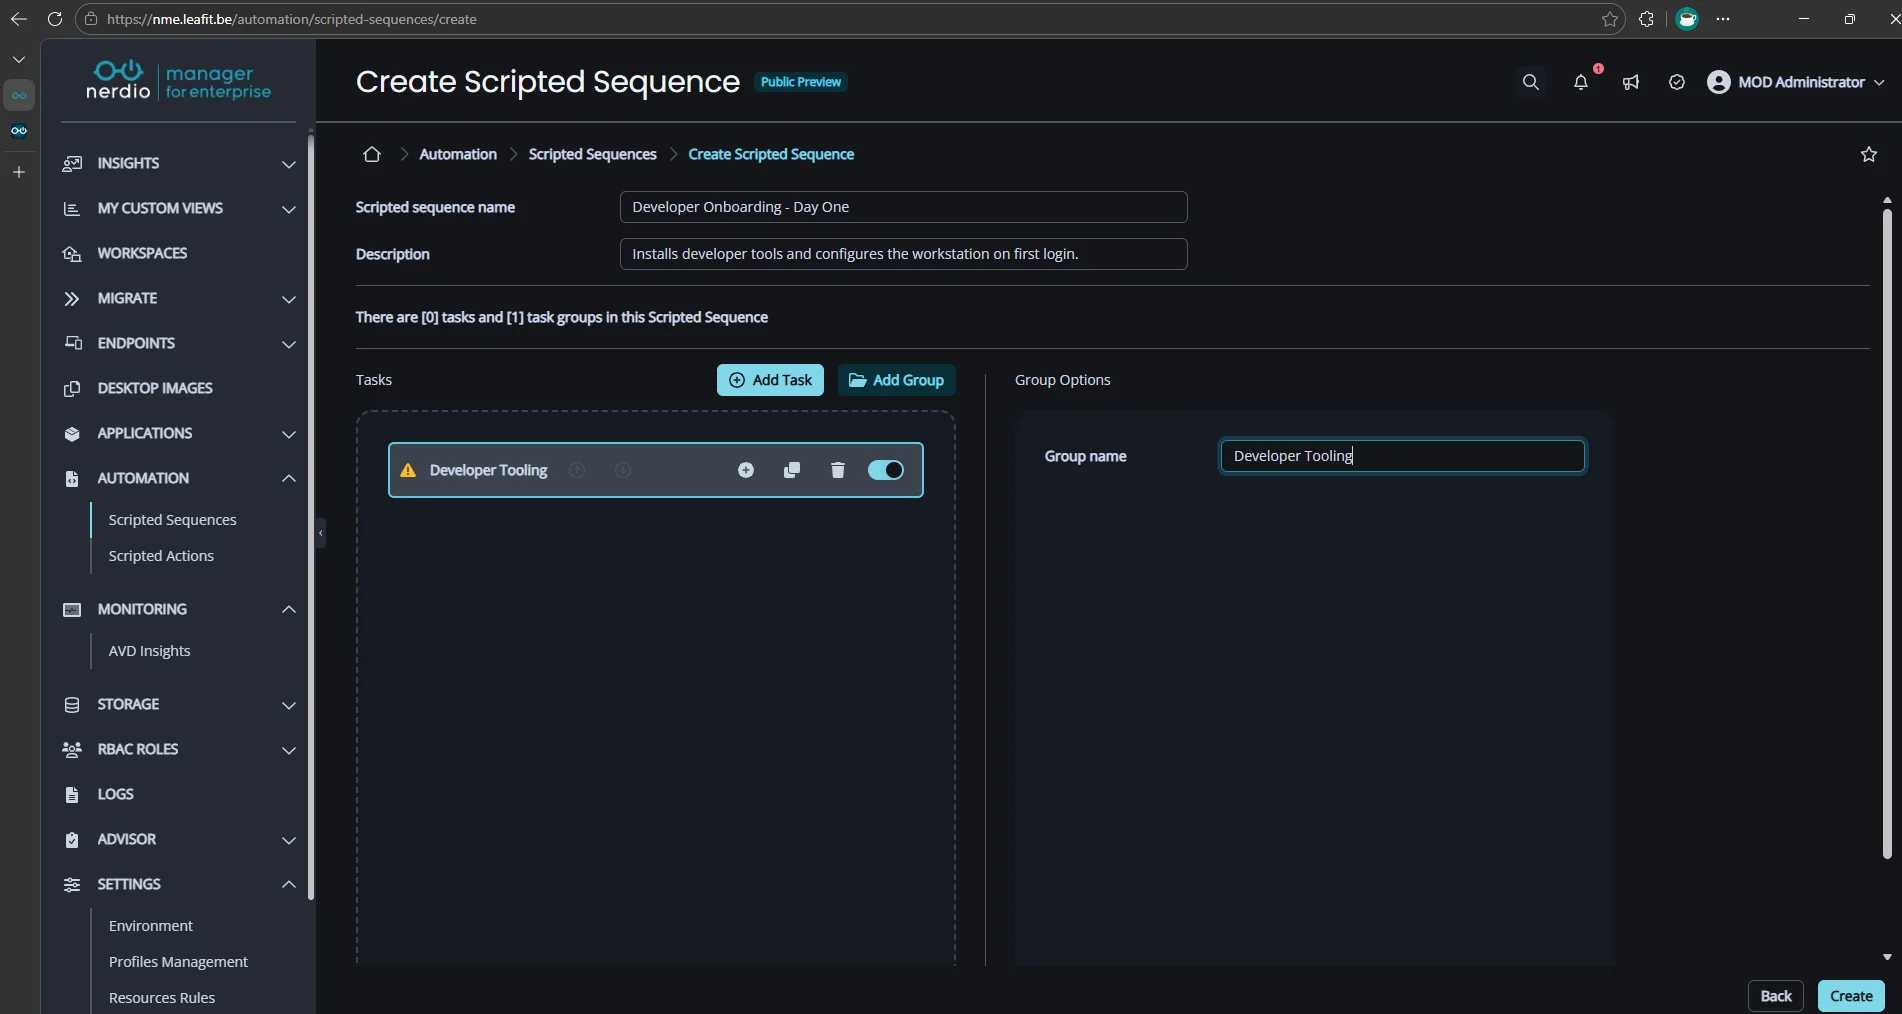
- Name the sequence
Developer Onboarding - Day One. - Optionally add a description: Installs developer tools and configures the workstation on first login.
Step 4: Add a Task Group
Task Groups let you organize related tasks. We will create one group for this sequence.
- Inside the sequence, click Add task or Add group.
- Select Add group.
- Name the group
Developer Tooling.
Note: A group must contain at least one task.
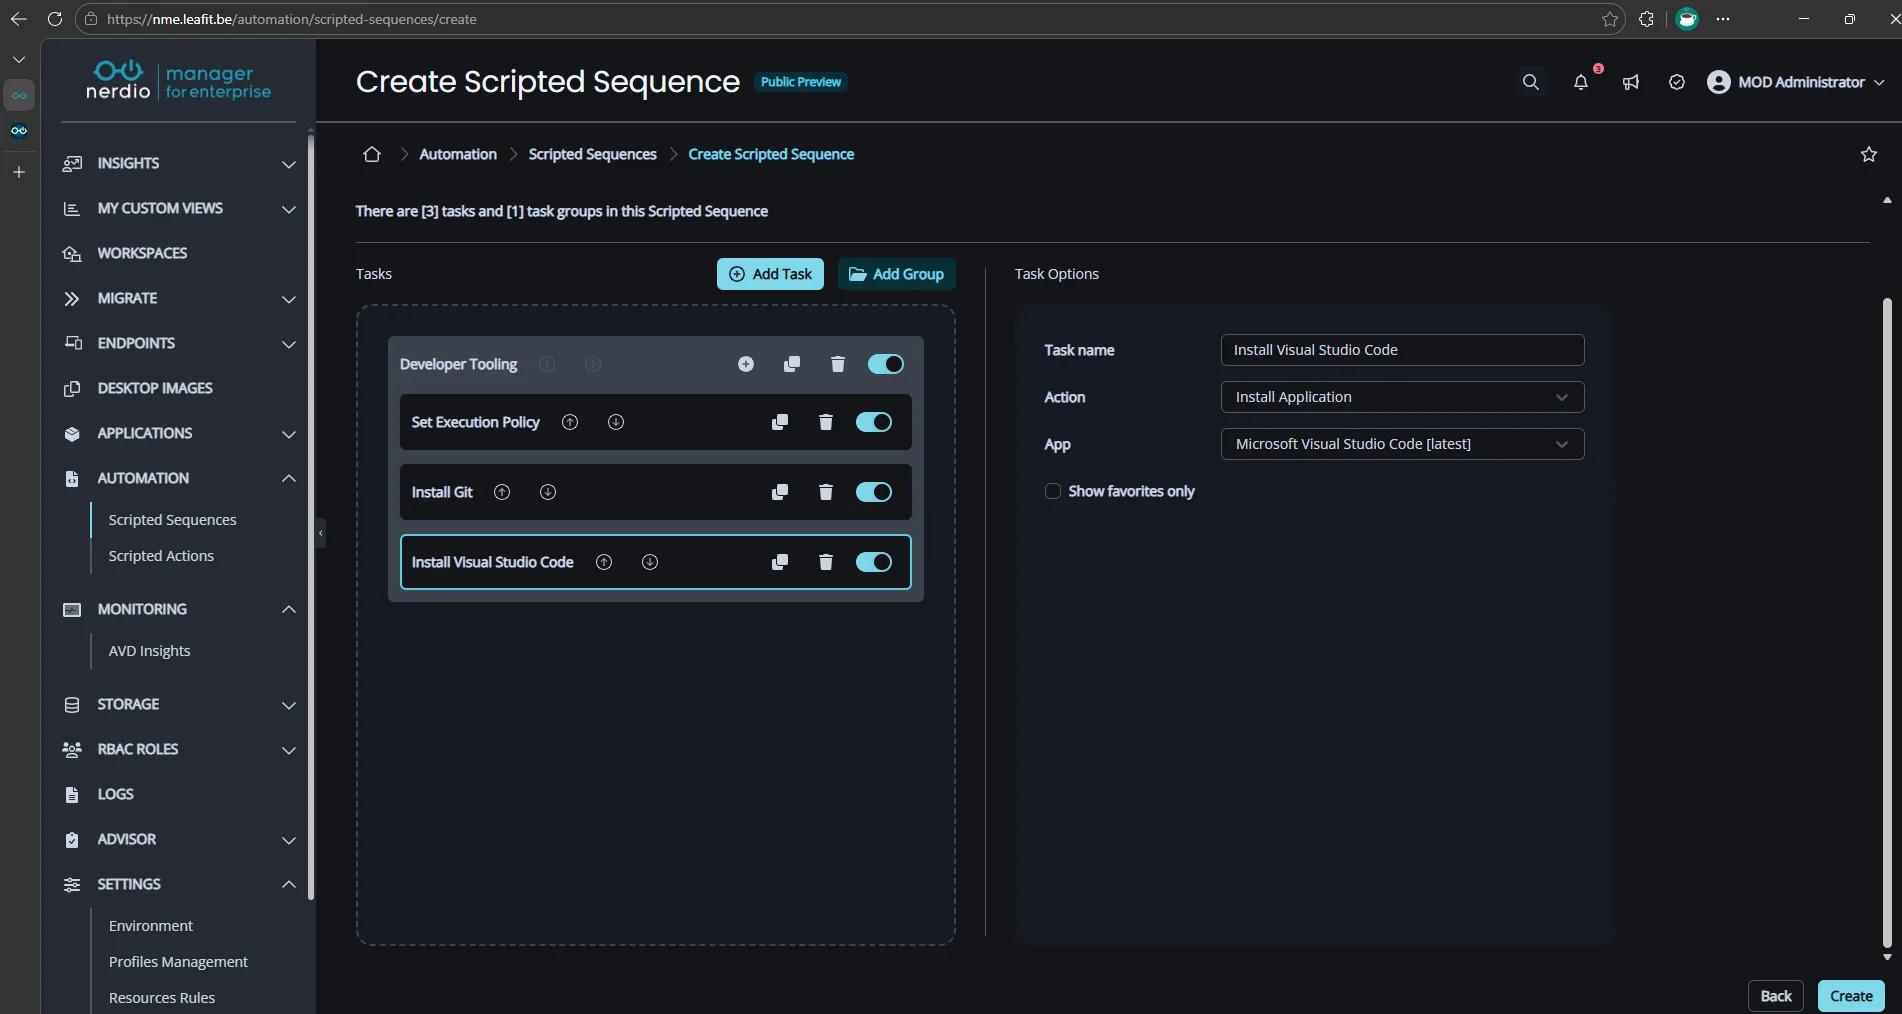
Step 5: Define the Tasks
Add the following six tasks inside the Developer Tooling group. The order you add them is the order they will execute.
Task 1: Set PowerShell Execution Policy
This ensures all subsequent PowerShell-based tasks can run.
- Task name:
Set Execution Policy - Type: PowerShell script
- Script:
Set-ExecutionPolicy -ExecutionPolicy RemoteSigned -Scope LocalMachine -Force
Task 2: Install Git
This task uses a PowerShell script to install Git via winget. You could also use the Install Application task type instead.
- Task name:
Install Git - Type: PowerShell script
- Script:
winget install --id Git.Git --accept-source-agreements --accept-package-agreements --silent
Task 3: Install Visual Studio Code
This task uses the Install Application task type, which lets you select a winget package directly without writing a script. You could also use a PowerShell script as shown in Task 2.
- Task name:
Install Visual Studio Code - Type: Install Application
- Winget package ID:
Microsoft.VisualStudioCode
Task 4: Clone Repos and Configure VS Code
This script clones the team repository and installs essential VS Code extensions. Adjust the repository URL and extension list to match your environment.
- Task name:
Configure Workstation - Type: PowerShell script
- Script:
# Refresh PATH so git and code are available
$env:Path = [System.Environment]::GetEnvironmentVariable("Path", "Machine") + ";" + [System.Environment]::GetEnvironmentVariable("Path", "User")

# Clone team repository
$repoPath = "$env:USERPROFILE\Source\Repos"
New-Item -ItemType Directory -Path $repoPath -Force | Out-Null
git clone https://dev.azure.com/contoso/project/_git/main-repo "$repoPath\main-repo"

# Install VS Code extensions
code --install-extension ms-vscode.powershell
code --install-extension ms-python.python
code --install-extension hashicorp.terraform
Task 5a: Add Registry Key
First, create the registry key that will hold the completion marker.
- Task name:
Log Completion - Action: Add Registry Key
- Key path:
HKLM\SOFTWARE\LeafIT\NerdioSequences
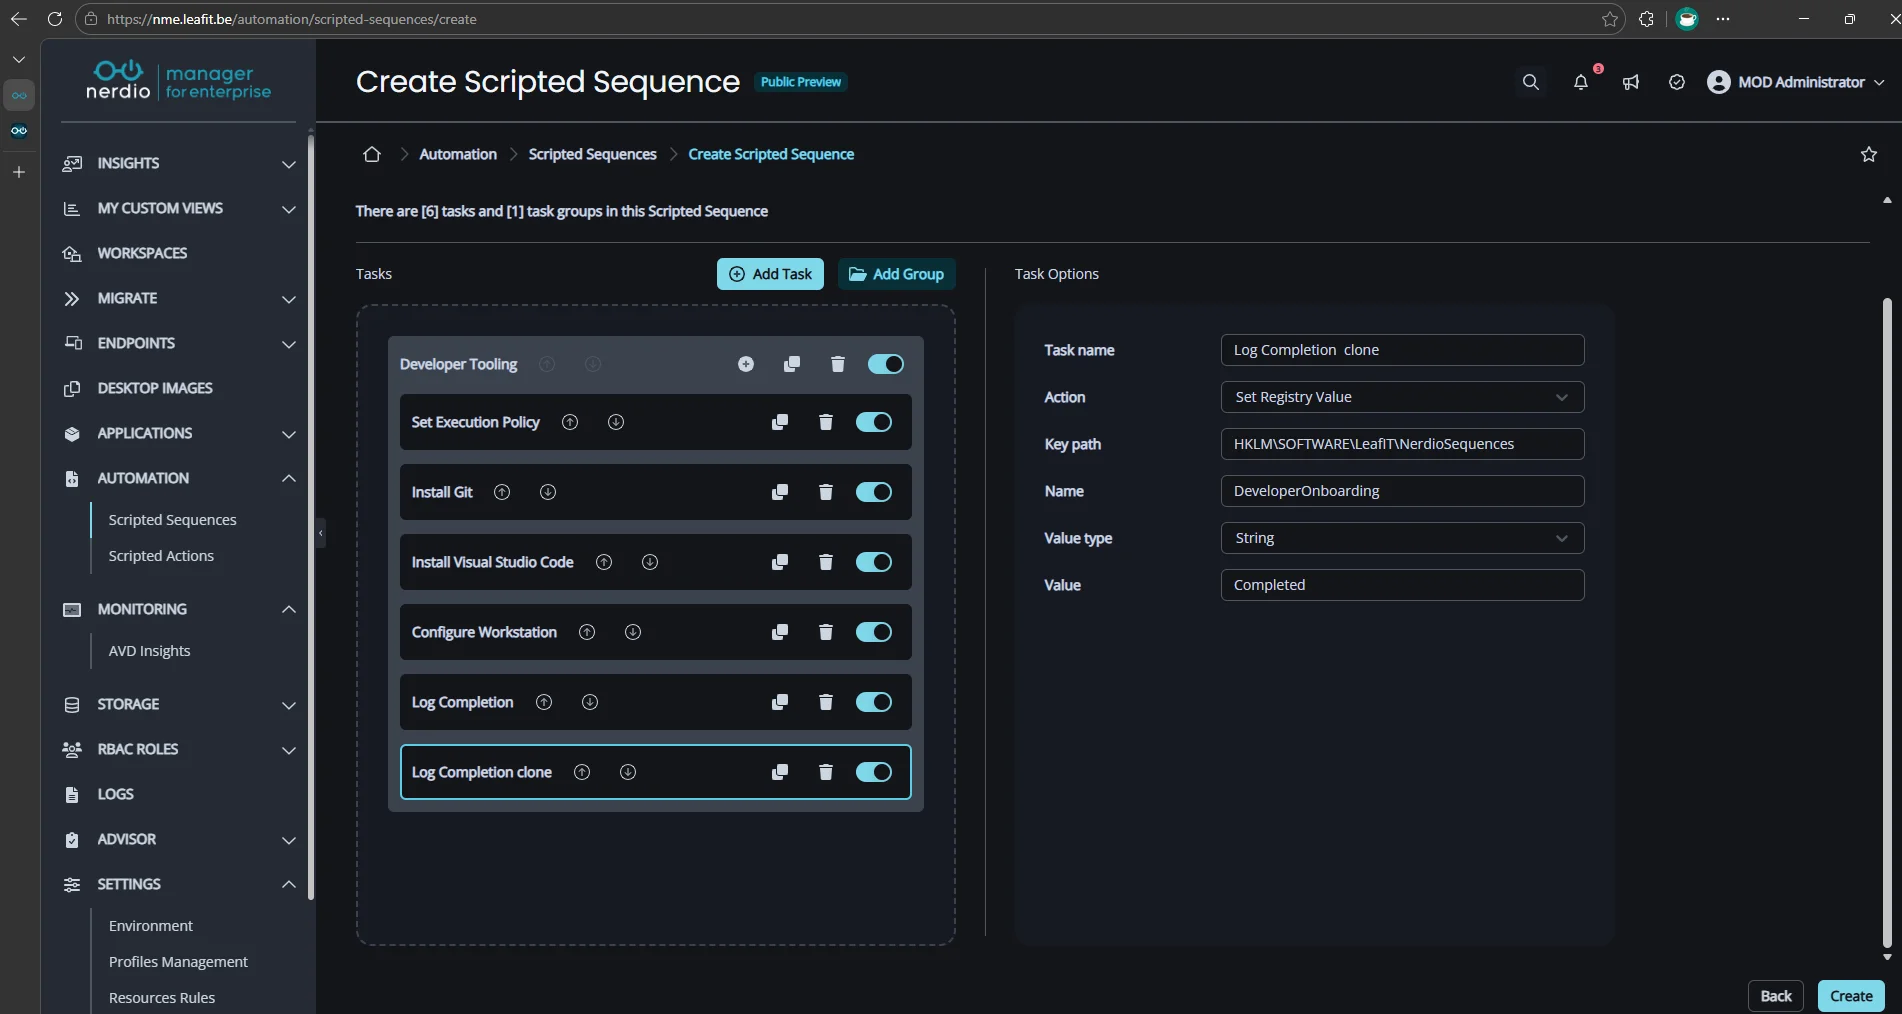
Task 5b: Set Registry Value
Next, set a value under the key to confirm the sequence completed. This makes it easy to query device status remotely via Intune or PowerShell.
- Task name:
Log Completion clone - Action: Set Registry Value
- Key path:
HKLM\SOFTWARE\LeafIT\NerdioSequences - Name:
DeveloperOnboarding - Value type: String
- Value:
Completed
Step 6: Clone Tasks for Quick Iteration
Need a second sequence for designers with different tools? Since NME v7.6.0, you can clone the entire sequence or individual task groups and tasks.
- On the Scripted Sequences page, select the
Developer Onboarding - Day Onesequence. - Click Clone.
- Rename the cloned sequence and swap Git/VS Code for the tools your designers need.
This saves significant time compared to rebuilding sequences from scratch.
Step 7: Target Devices and Execute
- On the Scripted Sequences page, click the three dots to the right of the
Developer Onboarding - Day Onesequence. - Click Run now.
- Select the target Windows 365 Cloud PC or Intune device.
NME will push the tasks to the Nerdio Endpoint Worker on the device. Each task runs in order. Task 2 only starts after Task 1 reports success.
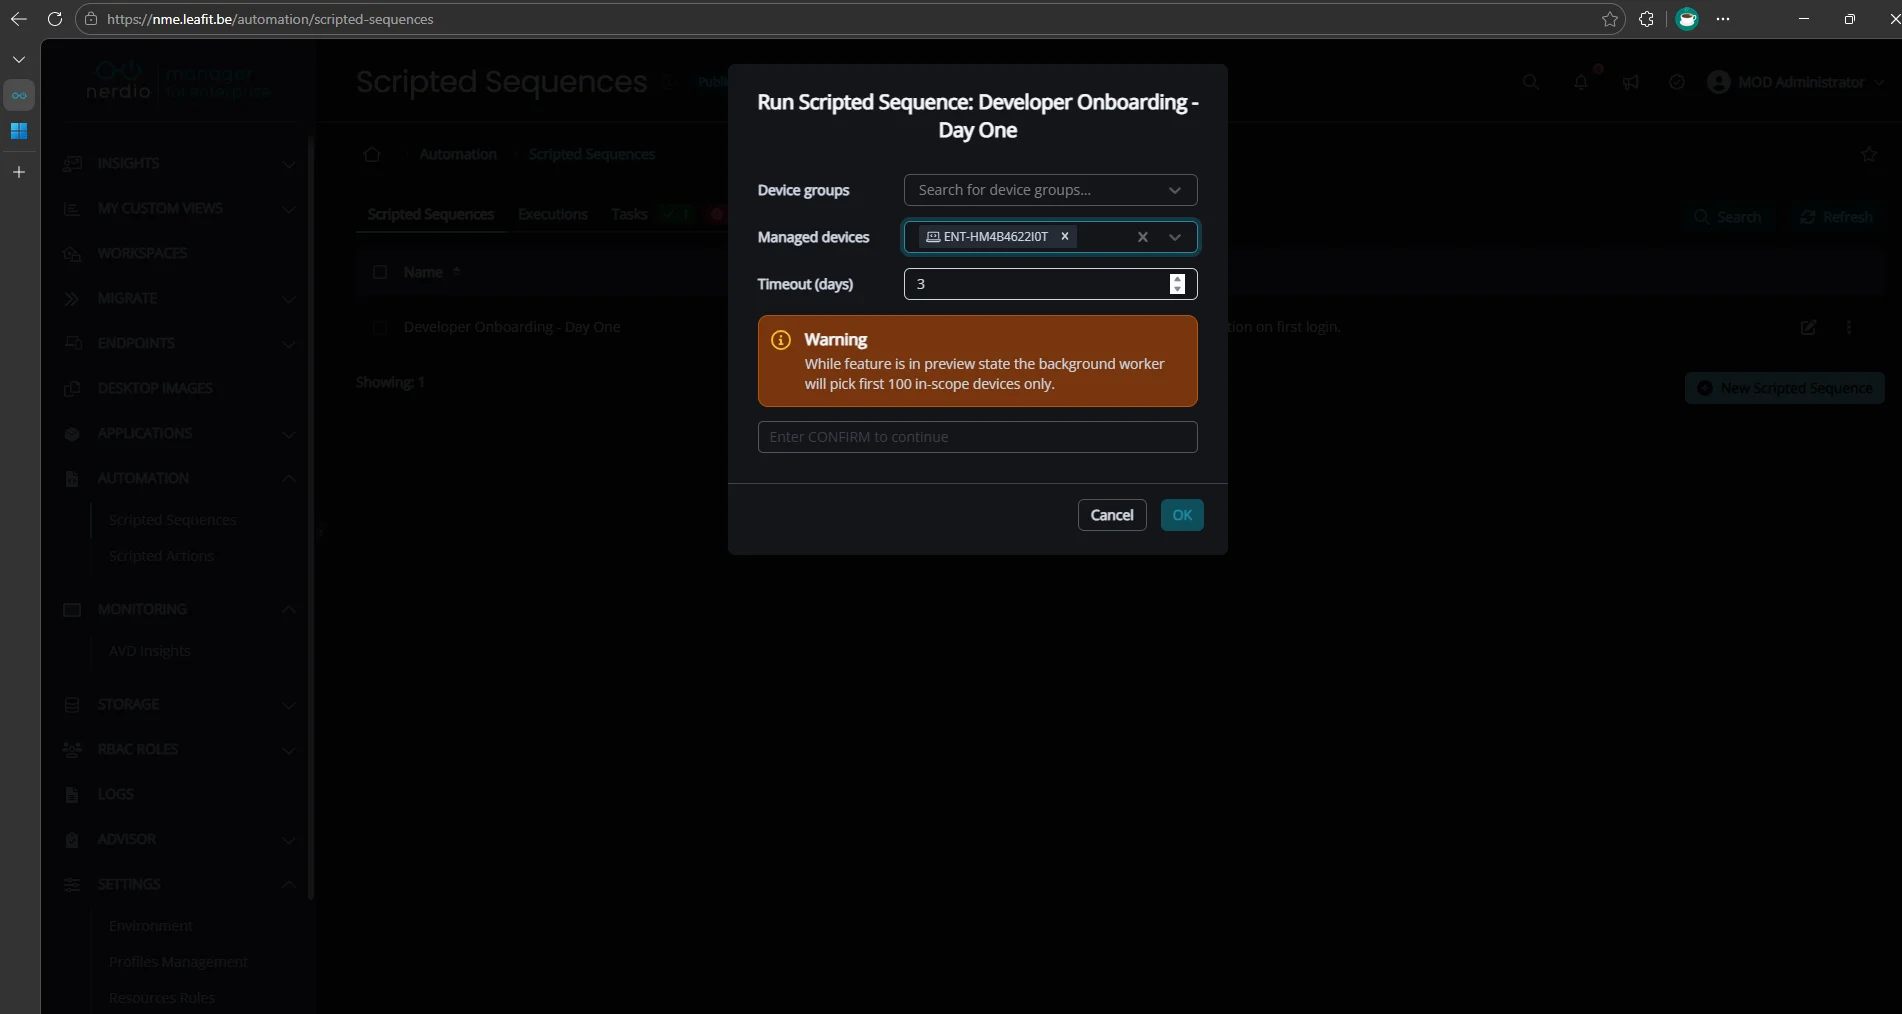
Tip: Monitor progress in NME > Logs.
Step 8: Validate on the Device
Log into the target Cloud PC and verify:
- Git is installed. Open a terminal and run
git --version. - VS Code is installed. Launch it from the Start menu.
- Repos are cloned. Check
%USERPROFILE%\Source\Repos\main-repo. - Extensions are present. Open VS Code and navigate to the Extensions panel.
- Registry key exists. Open a terminal and run
reg query "HKLM\SOFTWARE\LeafIT\NerdioSequences" /v DeveloperOnboarding.
Current Limitations
Scripted Sequences are still in Public Preview. Keep these constraints in mind:
| Limitation | Detail |
|---|---|
| Concurrency | Maximum 100 concurrent tasks per sequence |
| Device scope | Intune-managed devices only (AVD support planned for a future release) |
| Targeting | Manual device selection required; automated assignment to new devices is planned |
| Initial deployment | The Endpoint Worker relies on Intune platform script delivery, which can take time on first deploy |
| Cross-tenant | Running sequences against secondary tenant Windows 365 devices is not yet supported |
Conclusion
Nerdio Scripted Sequences bring deterministic, ordered task execution to Intune-managed devices. This is something native Intune cannot guarantee today. By combining simple PowerShell scripts in a defined sequence, you can automate complex onboarding workflows and ensure every new device is configured consistently.
As the feature moves toward general availability, expect expanded scope and deeper integration within NME. For now, it is already a practical tool for any organization managing Intune endpoints at scale.
Leave a Reply